Oftentimes, in Android applications, notifications are used to communicate with users about application updates and reminders. In this way, they tend to be really helpful when users are outside your app’s UI and allow for quick interactions like deleting an email or responding to a message.
In this blog post, we’ll cover how to display notifications, customize them with parameters and styles, manage them, add actions, and more.
This article presumes that you have some experience in building Android apps in Kotlin.
Project setup
To start, open up Android Studio and create a new project, or just open an existing project to add notification features to it.
No special dependencies are needed to work with notifications, just the core SDK.
Notification channels
Notification channels are a way to group notifications that our application sends into manageable groups.
From Android 8.0 (API level 26) and on, notifications need to be attributed to a channel, and for each channel, you can set the visual and acoustic behaviors that apply to all notifications in that specific channel.
With this, users have more flexibility in changing these settings and deciding whether a notification channel from your app should be intrusive, visible, and so on.
From a developer perspective, before displaying a notification you should create a channel first. Start by getting a reference to the NotificationManager. Following this, you’ll have to ensure that you’re running on an Android 8.0 device or higher—for that, you’ll have to make the required checks, and if needed, create the channel and add it.
Here’s a code snippet that creates a channel, customizes its behaviour, and adds it with NotificationManager:
companion object {
        private const val NOTIFICATION_ID = 112
        private const val PRIMARY_CHANNEL_ID = "primary_notification_channel"
}

private lateinit var notificationManager: NotificationManager

private fun createNotificationChannel() {
        notificationManager = getSystemService(Context.NOTIFICATION_SERVICE) as NotificationManager

        if (Build.VERSION.SDK_INT >= Build.VERSION_CODES.O) {
            val channel = NotificationChannel(
                PRIMARY_CHANNEL_ID,
                "Messages",
                NotificationManager.IMPORTANCE_HIGH
            )

            channel.enableLights(true)
            channel.lightColor = Color.RED
            channel.enableVibration(true)
            channel.description = "Messages Notification"
            notificationManager.createNotificationChannel(channel)
        }
    }
Display your first notification
To display a notification, you need to build it first, as the notification is something that holds a lot of parameters. The way to do so is through the NotificationCompat.Builder.
This builder will need a context and a channel in which the notification will be associated. Using this builder, you’ll set the different parameters of the notification.
For the purposes of this tutorial, we’ll start with something relatively simple, like a title, text, and a basic icon.
After you finish building the notification, to display it you can use either the NotificationManager or with NotificationManagerCompat to make the code more efficient, concise, and cleaner.
Both require a notification object (the one we created) and a notification ID that identifies this notification. This way we can get a reference to it if we want to update or cancel it.
Here’s a code block that creates a notification and displays it:
// creating the notification and its parameters.
val builder = NotificationCompat.Builder(this, PRIMARY_CHANNEL_ID).apply {
                setSmallIcon(R.drawable.ic_android)
                setContentTitle("Notification Article")
                setContentText("Learn How To Manage And Display Notifications in Android")
                setPriority(NotificationCompat.PRIORITY_DEFAULT)
            }

// displaying the notification with NotificationManagerCompat.
with(NotificationManagerCompat.from(this)) {
     notify(NOTIFICATION_ID, builder.build())
}

/* or you can use the notification manager object.
notificationManager.notify(NOTIFICATION_ID, notification.build())
*/
#Notification Parameters
When building a notification, you can use several public methods of the Builder object to customize the notification. Here are a few:
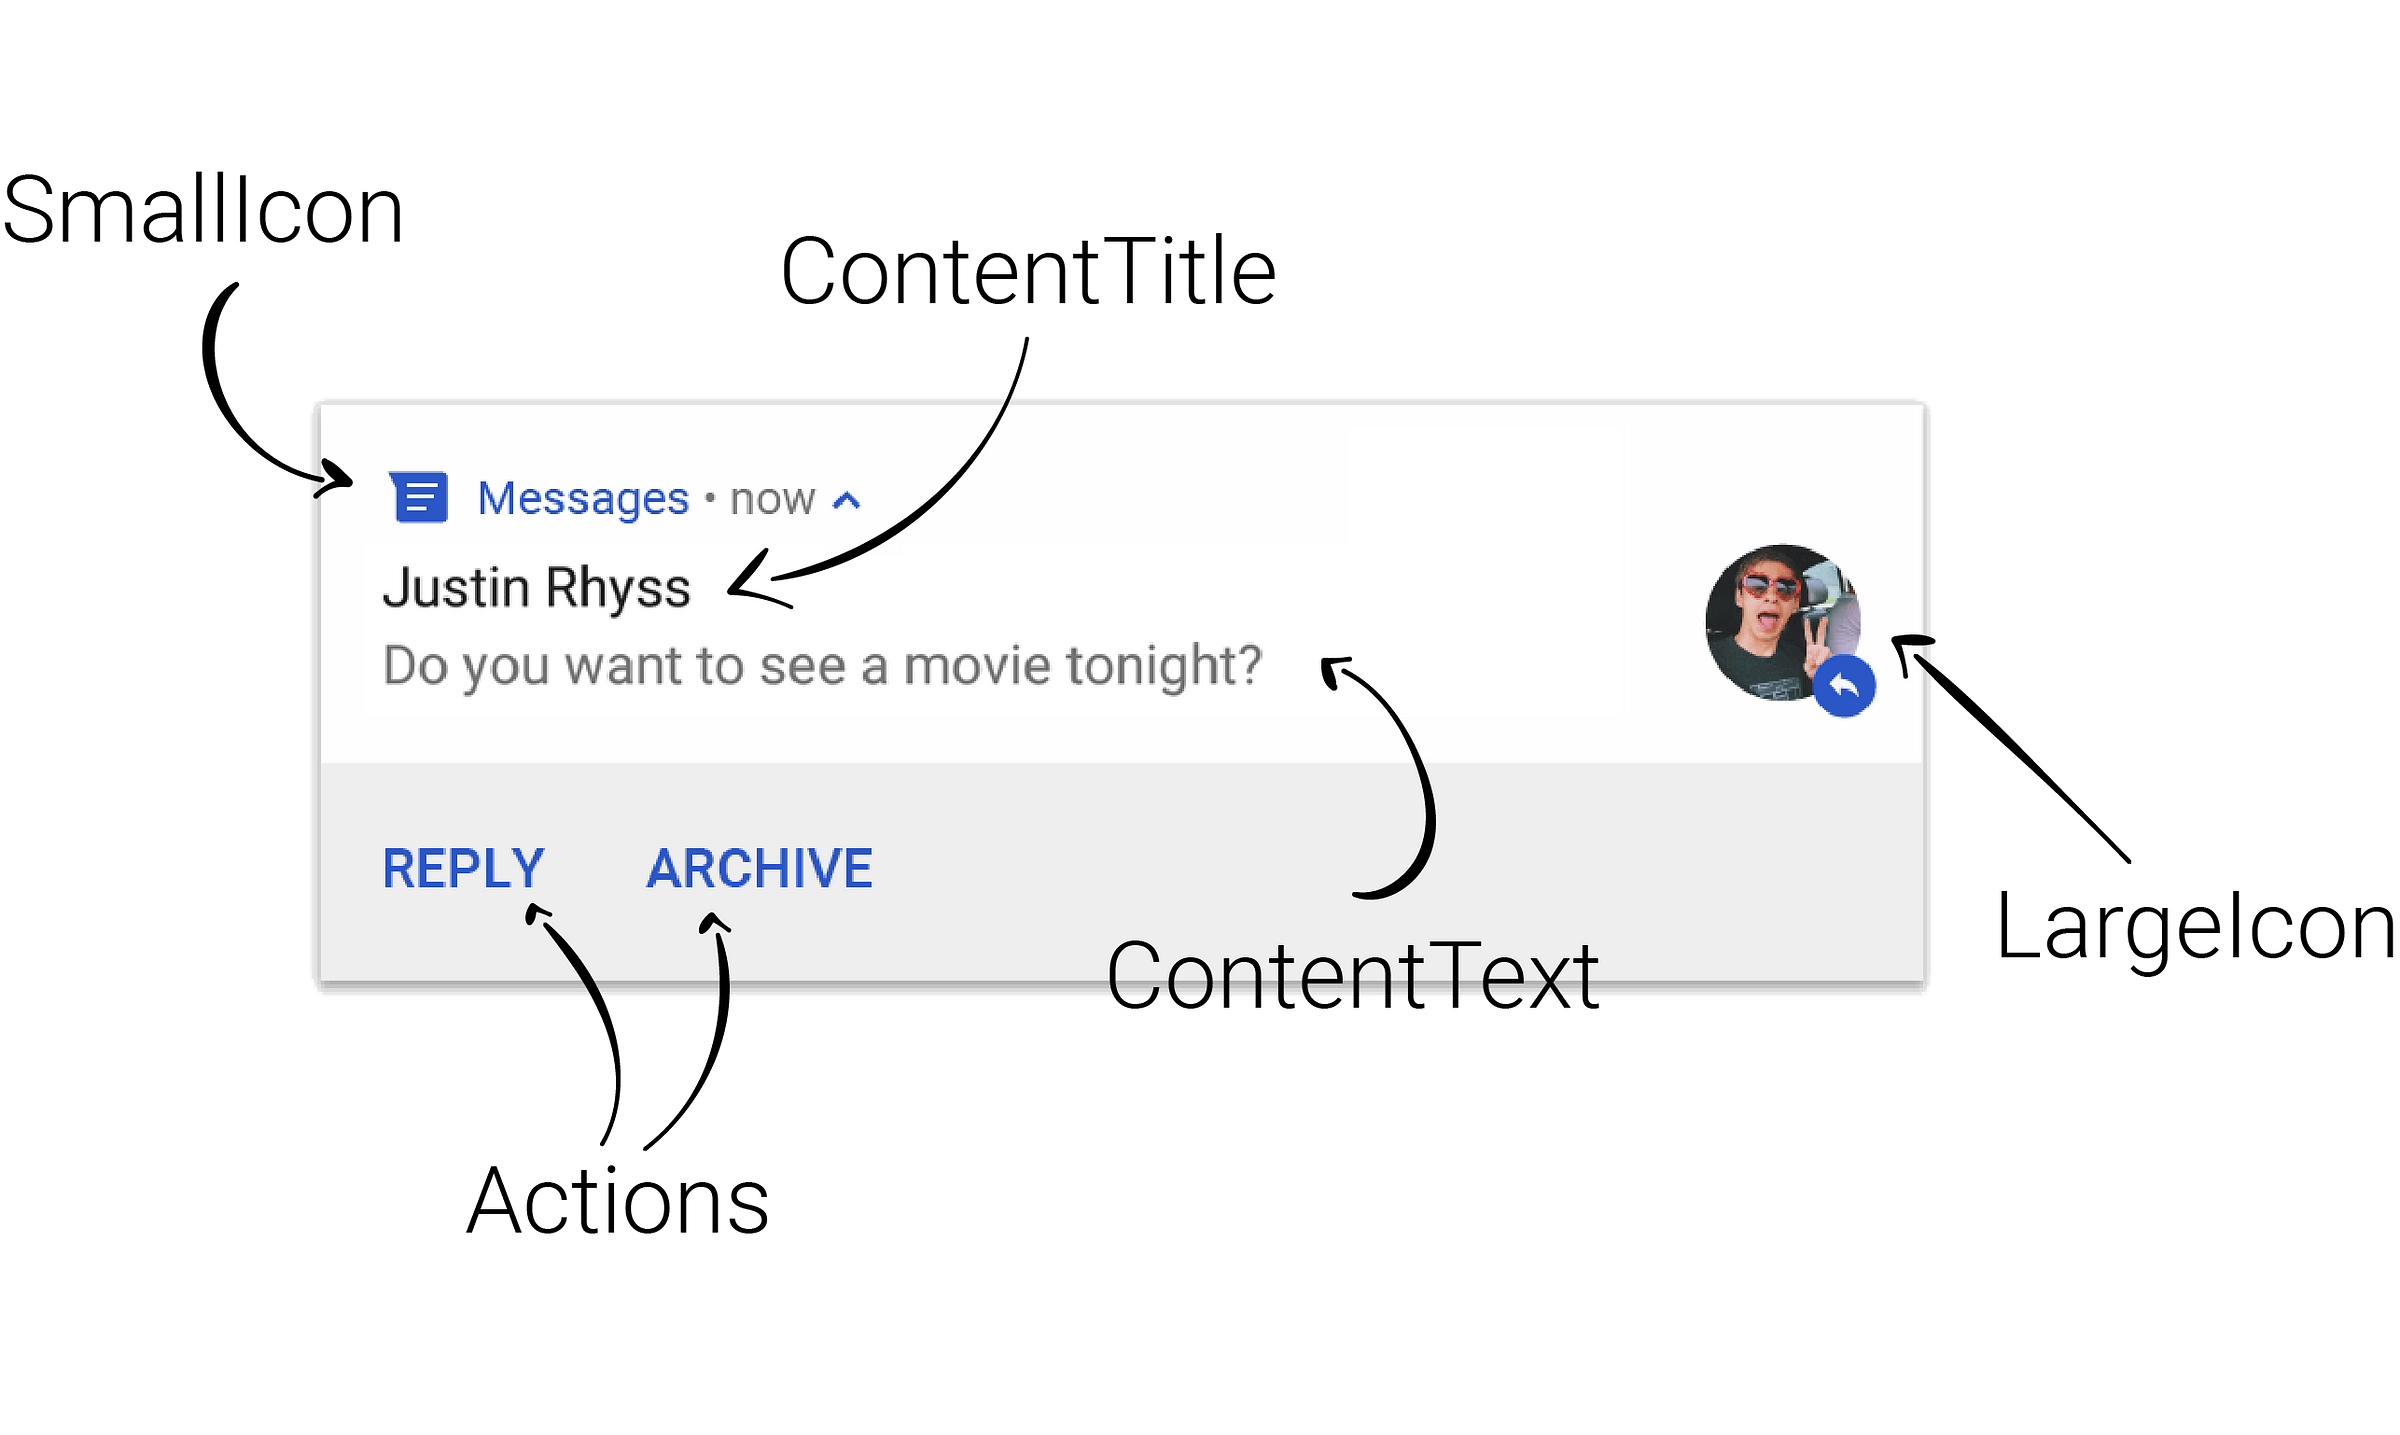
setContentTitle: Set the text that will appear as the title (first row) of the notification.setContentText: Set the text that will appear in the second row of the notification.setAutoCance: Bypassing a boolean to this method, you’re indicating whether you want the notification to be automatically canceled when the user taps it in the notification panel.setLargeIcon: A bitmap to display on the right side of the notification.setPriority: This method is used to set the priority of the notification, which is an indication of how important notification is for the user’s attention.setTimeoutAfter: Set the time after which this notification should be canceled, if it isn’t already.setSmallIcon: Set the icon that will be displayed in the notification.setStyle: This method allows you to add a rich notification style (such as inbox style).addActions: This method allows you to add an action to the notification using text, an optional icon that’s typically displayed by the system as a button with custom text icon, and aPendingIntent(we’ll talk about this shortly).setContentIntent: Use this method to supply aPendingIntent, sent when the notification is clicked.setDeleteIntent: Supply aPendingIntentto be sent when the user clears the notification from the notification panel.
Here’s an image that describes some of the visual components of the notification:

Update and cancel notifications
Sometimes when an event occurs, the notification needs to be changed or updated, and under some circumstances, it needs to be canceled — the Android framework offers simple functionalities for these circumstances:
- Canceling a notification: Call the
NotificationManager'scancel()method and pass the notification ID that you used when displaying it. You can also call thecancelAll()method to cancel all the notifications that are produced by your application.
Here’s a code snippet showing how to cancel a notification:
private fun cancelNotification() {
        notificationManager.cancel(NOTIFICATION_ID)
}
- Update Notification: Updating notifications is the same as displaying them. You need just to create another notification with the
builderobject, then ask theNotificationManagerto display it for you using the same notification ID. This way, theNotificationManagerwill know to update the notification with the new one.
Pending intents
Sometimes you want an action to be performed after a user taps a notification—like displaying an activity or starting a background service, or just sending an intent to a broadcast receiver.
All of these actions require an intent. And that’s a problem—we can’t use intents here.
If you want to launch an activity from your app, it isn’t a problem at all. When calling startActivity() with the intent from your app, your app has the permission to do so.
The problem occurs when the launcher (system component) tries to launch your activity without the required permissions. For that reason, we need another kind of intent that your app can give to another—this is called a pending intent.
A PendingIntent is kind of token that you give to other applications (e.g NotificationManager), which allows the foreign application to use your application's permissions to perform something.
So if you give the foreign application an intent, it will execute your intent with its own permissions. But if you give the foreign application a PendingIntent, that application will execute your intent using your application's permission.
You can create a PendingIntent using static methods like getActivity() and getService(), depending on the component you want to launch. And within these methods, you should define an intent like you would in normal situations. You can also add flags and parameters—this way, the PendingIntent acts as a wrapper for your intent to be used by a foreign application.
We’ll create a PendingIntent to launch the MainActivity after tapping the notification. Here’s the code to do so:
val intent = Intent(this, MainActivity::class.java).apply {
            flags = Intent.FLAG_ACTIVITY_NEW_TASK or Intent.FLAG_ACTIVITY_CLEAR_TASK
        }

val pendingIntent: PendingIntent = PendingIntent.getActivity(this, 0, intent, 0)

val builder = NotificationCompat.Builder(this, PRIMARY_CHANNEL_ID).apply {
    setSmallIcon(R.drawable.ic_android)
    setContentIntent(pendingIntent)
    setContentTitle("Notification Article")
    setContentText("Learn How To Manage And Display Notifications in Android")
    setAutoCancel(true)
    setPriority(NotificationCompat.PRIORITY_DEFAULT)
}


with(NotificationManagerCompat.from(this)) {
    notify(NOTIFICATION_ID, builder.build())
}
Customize with action
You can do many other things after you know how to trigger actions from notifications using PendingIntent.
One of these things is adding buttons or actions in the notification for launching a process after a user taps it—or example, say you want to delete an email after the user taps the delete action in the notification.
For this, you need two main things: a PendingIntent that launches the process (either in a background service or through a broadcast receiver), and then to pass this intent to the notification builder through the addAction() methods that take an icon and a string title.
Here is a code snippet to demonstrate that:
val deleteIntent = Intent(this, DeleteBroadcastReceiver::class.java).apply {
                action = ACTION_DELETE
                putExtra(EXTRA_EMAIL_ID, EMAIL_ID)
}

val deletePendingIntent: PendingIntent =  PendingIntent.getBroadcast(this, 0, deleteIntent, 0)

val builder = NotificationCompat.Builder(this, PRIMARY_CHANNEL_ID).apply {
                setSmallIcon(R.drawable.ic_android)
                setContentTitle("Notification Article")
                setContentText("Learn How To Manage And Display Notifications in Android")
                setPriority(NotificationCompat.PRIORITY_DEFAULT)
                setContentIntent(pendingIntent)
                addAction(R.drawable.ic_delete, "Delete", deletePendingIntent)
              }
Expandable notifications

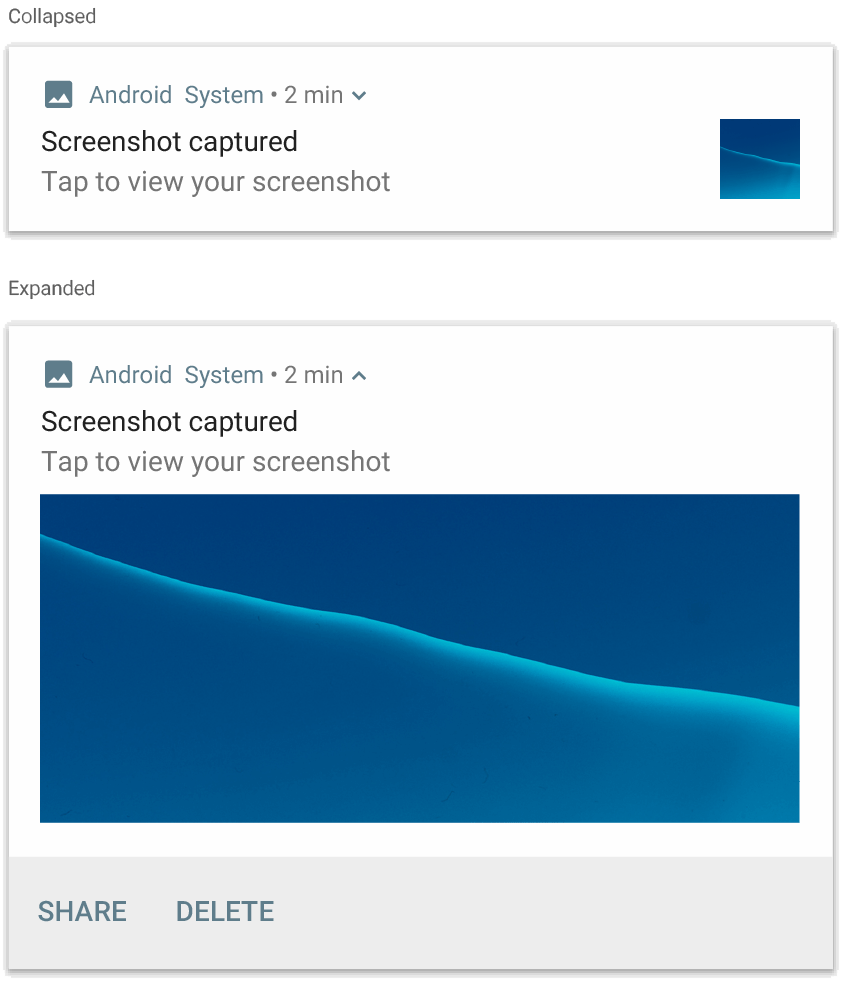
If you’re trying to display text that’s too big to fit in a normal-sized notification (like emails) or to show a big image that the user wants to see before entering the app, you can make your notification expandable.
The way to achieve this is through adding styles to the notification, mainly a BigTextStyle or BigPictureStyle. These are predefined styles with predefined behaviours to handle the expandability of your notifications, depending on what you’re trying to display.
Adding these styles is done through the setStyle method, which allows you to indicate to the builder object on which you want a specific style.
With BigTextStyle, you can add the text you want to display like in the following snippet:
var notification = NotificationCompat.Builder(context, CHANNEL_ID)
        .setSmallIcon(R.drawable.new_mail)
        .setContentTitle(emailObject.getSenderName())
        .setContentText(emailObject.getSubject())
        .setLargeIcon(emailObject.getSenderAvatar())
        .setStyle(NotificationCompat.BigTextStyle()
                .bigText(emailObject.getSubjectAndSnippet()))
        .build()
For BigPictureStyle, you also need to specify the style again and the image you want to expand, as shown in the following line of codes:
var notification = NotificationCompat.Builder(context, CHANNEL_ID)
        .setSmallIcon(R.drawable.new_post)
        .setContentTitle(imageTitle)
        .setContentText(imageDescription)
        .setLargeIcon(myBitmap)
        .setStyle(NotificationCompat.BigPictureStyle()
                .bigPicture(myBitmap)
                .bigLargeIcon(null))
        .build()
Other Notification Styles
Besides the aforementioned styles, there are other styles you can use in your notifications to make for a better user experience. Here are a few of them:
- Notification.InboxStyle: Notification style for generating large-format notifications that include a list of strings.
- Notification.MediaStyle: Notification style for media playback notifications.
- Notification.MessagingStyle: Style for generating large-format notifications that include multiple back-and-forth messages of varying types between any number of people.
Resources
- A good article explaining the use of different notification styles.
- The main guide from the developer documentation.
Here are some specific documentation pages to check out:
Conclusion
I hope you enjoyed learning how to create dynamic notifications: how to display them, how to add styles, and more importantly, how to manage them effectively.
There is much more to learn about notifications, such as creating a group of notifications or creating a custom notification design like many apps do, among others. Now that you’ve acquired a basic understanding, I’d encourage you to check out these more advanced concepts.
